Weather Strip Replacement
3 steps to Fix Your Springs Today

step 1
Quick Booking- Give us a call or book online to schedule a free inspection and estimate.
- Choose a time that works for you — same-day service available 24/7. (Sometimes, next hour)
- Next, you will receive a text or email confirmation with all the appointment details.

step 2
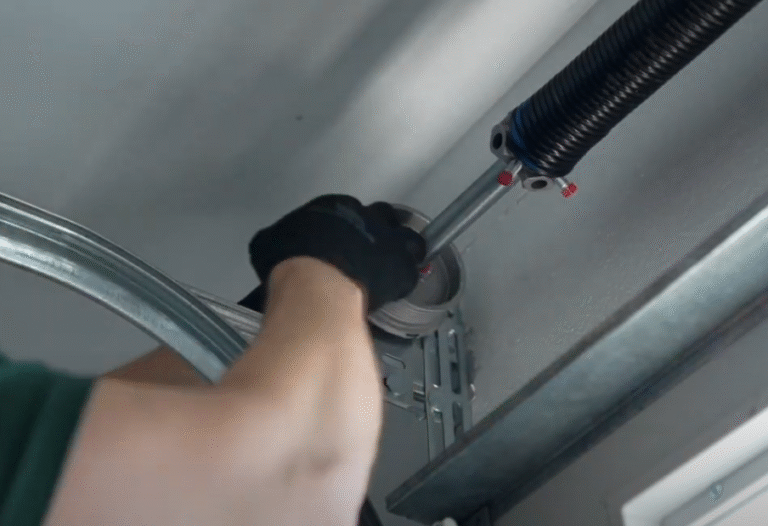
Inspection, Estimate, Repair- In the second step, our technician arrives on-site, performs a full inspection of the garage door system, measures and selects the perfect SPRINGS based on the door’s weight and type,
- Аnd then offers three different solutions, ranging from budget-friendly to premium with a lifetime warranty.

step 3
Clean Finish- Once the repair is complete, our technician will clean up the workspace and dispose of any old parts or debris.
- We’ll walk you through the completed repair, explain how to use any new components, and answer your questions.
- You’ll receive a detailed invoice with a breakdown of the work and warranty information (if applicable).
- We accept payment via cash, credit card, Zelle, or Venmo — or ask us about our financing options.
Starting at $275
What Our Clients Say About Us
Discover firsthand experiences from our satisfied customers. Their stories are the testament to our commitment to excellence

Real Cases
Garage Door Springs & Opener Replacement in Laguna Hills – Fixed After a Year of Issues
Emergency Garage Door Spring Replacement in Trabuco Canyon – Restored Access Same Day for Returning Customer
Dual Garage Door Opener Replacement in Mission Viejo – Upgraded to Top LiftMaster Models for Long-Lasting Performance
High-Lift Garage Door Conversion in Laguna Niguel – Created Extra Clearance for Car Lift Storage of Two Sports Cars
Questions about Weather Strip Replacement
Can I replace the garage door weather stripping myself?
While it’s possible to replace the weather stripping on your own, hiring a professional ensures a perfect fit and thorough sealing, which prevents issues like gaps or improper insulation.
What kinds of weather stripping are available for garage doors?
How much does it cost to replace garage door weather stripping?
What should I do if I notice gaps after installation?
Complete guide to installing garage door weather stripping for enhanced home protection and insulation
Installing weatherstripping on your garage door is a crucial step in protecting your home and increasing its energy efficiency. Weatherstripping prevents dust, water, and pests from entering your garage, and significantly improves the insulation of your door. This simple yet effective solution can noticeably enhance your home’s curb appeal and ensure your garage remains a safe, clean, and comfortable space.
Sealing the gaps around your garage door protects your belongings from harsh weather conditions and contributes to a more energy-efficient home, reducing heating and cooling costs throughout the year.
Why install garage door weather stripping?
Installing weatherstripping on your garage door offers numerous benefits:
Improved insulation: Weatherstripping insulates your garage door, maintaining a stable temperature inside. This increases comfort and reduces the strain on your heating and cooling system, leading to energy savings.
Energy cost savings: Maximum garage insulation results in significant energy cost savings, effectively minimizing heat loss in winter and blocking excessive heat gain in summer.
Pest prevention: Sealing gaps with weatherstripping prevents pests from entering your garage, ensuring a clean garage and protecting your home from infestations.
Weather protection: Weatherstripping shields against rain, snow, dust, and debris, protecting your stored belongings from damage and wear.
Here’s what you’ll need to install weatherstripping on your garage door:
Tools:
- Tape measure: To measure the garage door and weatherstripping.
- Utility knife: To cut the weatherstripping.
- Screwdriver: For fastening elements and adjusting the weatherstripping.
- Hammer or pry bar: To secure the weatherstripping.
- Pry bar: To remove old weatherstripping.
- Caulk gun: To apply caulk around the weatherstripping.
Materials:
- Weatherstripping kit: Compatible with the type of your garage door.
- Galvanized nails or screws: To fasten the weatherstripping.
- Waterproof and elastic caulk: To seal around the weatherstripping.
- Rag and cleaning solution: To clean the garage door frame.
Before you begin:
- Disconnect the garage door opener.
- Close the door and secure it with clamps or vise grips.
- Wear safety glasses and gloves.
- Lay out your tools and materials in an organized manner.
- Use a stable ladder if necessary.
Step-by-step installation guide
Before installing a new seal, remove the old one. Inspect how it is attached – with nails or screws. Remove the fasteners and carefully remove the seal. Clean the gate frame from any remaining glue and debris.
Then measure the gate frame and cut the new seal to the required length. Use a utility knife or scissors for cutting.
Start the installation from the top of the gate, pressing the seal firmly against the frame. Then install the side seals, overlapping them with the top one. Finally, install the bottom seal, trimming it to length if necessary.
For additional sealing, apply sealant along the edges of the seal. Open and close the gate several times to ensure it operates smoothly and there are no gaps. If necessary, adjust the seal to achieve perfect sealing.
Types of garage door weather seals
For effective protection of your garage from weather elements, drafts, and to improve your home’s energy efficiency, choosing and installing the right garage door seal is crucial. There are several types of seals available, each with its own characteristics.
Vinyl seals are the most common option. They are durable, flexible, and provide good protection against moisture. Thermoblok seals are designed for extreme temperatures and help maintain a comfortable microclimate in your garage. Rubber strip seals are a good choice for older doors with uneven surfaces, as they adapt well to them.
When choosing a seal, consider its thickness, width, and material. Make sure it is compatible with the type of your garage door.
Installation is relatively straightforward but requires attention to detail. First, remove the old seal and clean the door frame from dirt and debris. Then measure the frame and cut the new seal to the required length. Start the installation from the top of the door, pressing the seal firmly against the frame. Then install the side seals, overlapping them with the top one. Finally, install the bottom seal, trimming it to length if necessary. For additional sealing, apply sealant along the edges of the seal.
To prolong the life of your seal, proper maintenance is essential. Regularly clean it from dirt and dust, check for any damage, and replace worn-out sections promptly. Lubricate the moving parts of the door to reduce friction and extend the seal’s lifespan.
Protect the seal from direct sunlight, as it can lead to premature aging.
Trusted & Recognized by Leading
Industry Platforms
Our technicians are highly skilled and experienced, fully bonded, licensed, and insured. This ensures peace of mind when you choose to work with us.


 See You Soon!